Completing a Swap
The tasks required to be completed by operators include completing a battery swap and clearing simple system errors. It is important that all operators are familiar with the following section in order to ensure safe and smooth operation of the PowerHive system.
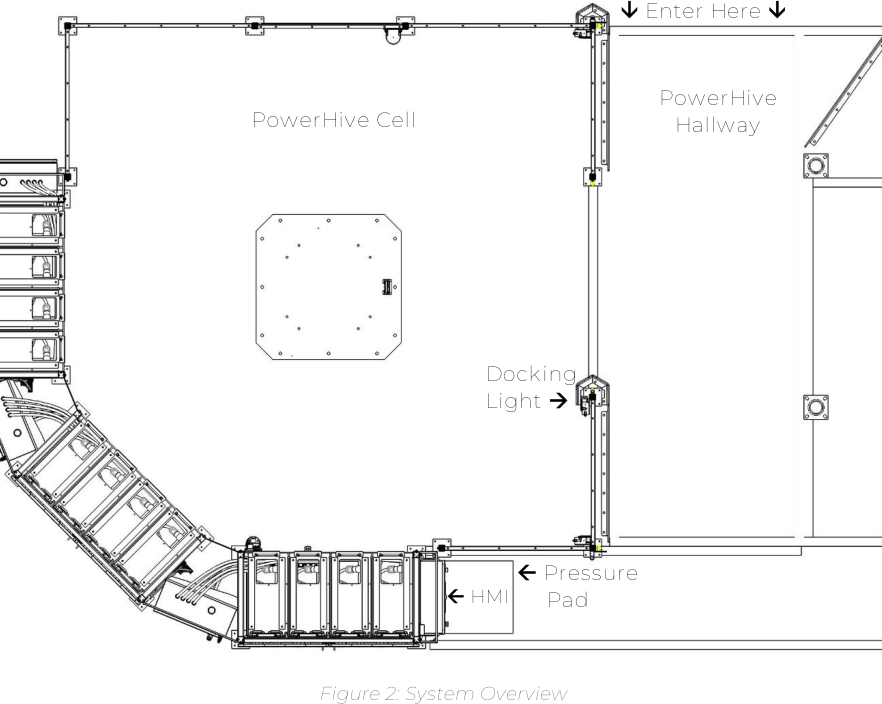
4.1 Diagrams and Terminology
4.1.2 PowerHive Overview
4.1.3 HMI Overview

Definitions
- BDI: Battery Display Indicator
- Docking Light: A vertical light bar located at the top of the opening to the PowerHive Cell. The light will turn green when a battery in the hallway is in a swapable location.
- E-Stop: Emergency Stop button. Used to halt all PowerHive system operations.
- “Go” Button: Physical button used for triggering tasks and resetting errors.
- HMI: Also known as the Human / Machine Interface. Contains the buttons and touchscreen used for interacting with the PowerHive system.
- Pressure Pad: A black mat that detects the presence of an operator. Operators must remain on the pressure pad throughout the entirety of a swap.
- SOC: State of Charge
4.2 Completing a Battery Swap
4.2.1 Parking the Forklift
- As you approach the PowerHive, perform a visible check to make sure there are no obstructions in the hallway.
- Pull the truck into the hallway such that the battery is on the robot side of the hallway.
- In most cases the ROBOT should be on your RIGHT side when parking.
- As you park, utilize the docking light located above the robot cell opening.
- Pull in slowly and parallel to the hallway.
- When the docking light turns green, stop the truck and apply the parking brake.
- Complete site-specific steps for preparing the truck for a swap.
- Some trucks require lifting of the seat before the swap can occur.
- Some trucks require lifting the battery retention bracket before a swap.
- The system is programmed to complete any ongoing “idle” task when a truck is detected, then go to “home position” to wait for a swap to be initiated.
- Walk to (and stand on) the pressure pad located at the base of the HMI.
4.2.2 Initiating the Swap
-
While standing on the pressure pad, perform a visual check of the hallway and robot cell. Ensure there are no people or other obstruction present in the hallway or cell.
-
After the visible check has been completed, wait for the green Go Button to begin flashing.

- If the green light does not start flashing, the system may be finishing an “idle task” such as moving or scanning a battery in the racks. This can take as much as 30s to complete in some rare cases.
- If the Docking Light is green, the system is aware of the forklift and will eventually go to the home position to prepare for a swap.
-
Press the green flashing Go Button to initiate the swap.
Note: If the system detects that a person is visible in the cell or hallway the user will be informed via the HMI to perform a second check. If the seat needs to be raised, it will notify the user.
4.2.3 During the Swap
- During the swap the HMI will display the current and completed steps.
- A green bubble next to a step means that the step has been completed.
- Yellow means the step is in progress.
- Red means a step has failed.
- Stay on the Pressure Pad
- If you leave the pad, a 5 second warning timer starts and the HMI will begin beeping.
- Staying off the pad for more than 5 seconds will result in a pause in the swap process until you return to the pad.
E-Stop Notes: Throughout the swap the operator should be aware of the robot’s actions. If necessary due to a collision or other dangerous malfunction, press the Emergency Stop button, move to a safe location, inform a supervisor, and contact service.
4.2.4 Finishing the Swap

- Once a swap has finished, the HMI will inform the operator and request you return to your truck.
- At this time, return to your truck and pull out of the hallway.
- Notice the red lights on the floor will change from blocking out the hallway, to blocking out the robot area.
- Flashing red lights on the floor indicate that light curtain has been tripped and should be corrected before leaving the area.
Note: Before leaving the hallway, double check that the red light on the floor is SOLID RED (not flashing). If the light on the floor is flashing, go to the HMI and press the green button to reset the system before leaving the area.